Positive and Negative space- Lesson 4 in Space Element of Art

Space is the area around and within the subject of your art or you could say that it is the picture plane where your art is created. It can be said that it is a technique that creates an illusion of depth and volume on a flat surface of the paper.

We can classify space into two components: Positive space and Negative space.

Positive space is the main idea or subject of the artwork to which your eye is drawn whereas Negative space is the area around it.

In this exercise, we will learn about positive and negative space with an artwork where we will draw our hands as a positive and negative space.

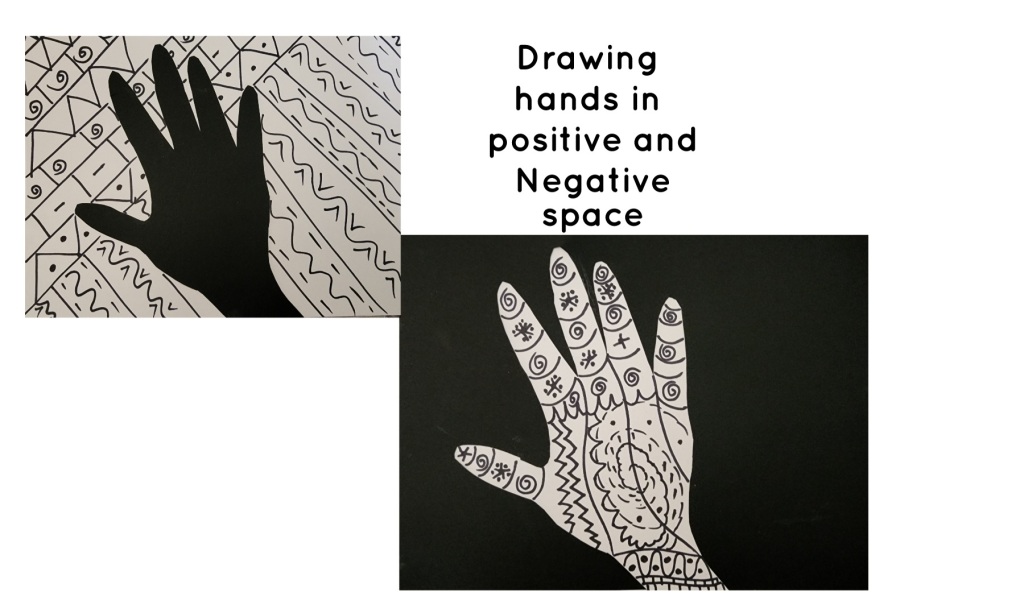
The positive space will have details with line art using black permanent marker!!

Please follow along on Youtube to watch this lesson in video format or continue reading

Things needed:

  1. Two White mixed media paper
  2. One Black paper
  3. White colored pencil
  4. Black permanent marker
  5. glue and scissors

Steps to follow:

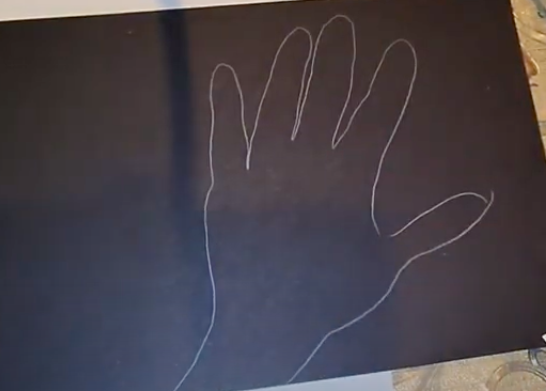
  1. Using your white colored pencil draw an outline of your hands on the black paper.
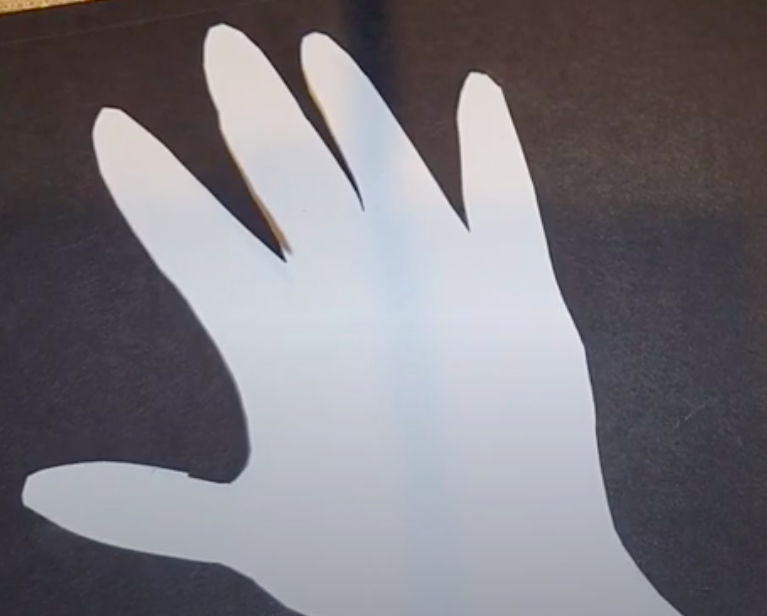
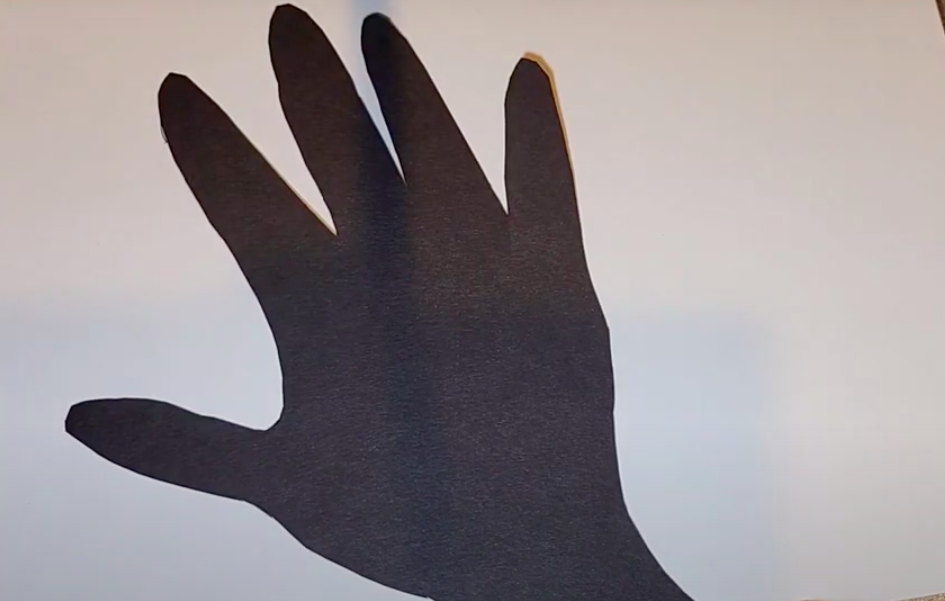
  2. Then create a neat cut out, so that you have a black hand shaped cutout and the paper around it creating a hand shaped hole.
  3. Stick each of these on the two white drawing paper.
  4. The black area is your negative space.
  5. So now you have one artwork with your hand as the positive space and another one with your hand as the negative space.
  6. I designed the positive area with some line art, but you can choose to do something else too!
Step 1 : outline of hand
Step 2& Step 3: Creating cutout and stick it on white paper
Step 2 and Step 3: Creating cutout and stick it on white paper
Step 5 and Step 6: Adding a line art to your positive spaces( white area)

Placement in relation to Horizon and Size of the object: Lesson 2 in Space Element of art

An important way to create a sense of space in your art is the use of horizon line or eye- level.

Horizon line- It is a visual boundary that you would draw across the plane of paper when you want to separate the sky from the land or water body.

Eye-level- This is also the same concept as horizon line except we use this term more often when we are working with indoor objects,  for example, the line that would separate a table from the wall when you are drawing a vase on the table.

Another way to create a sense of space is the size of the object, the object that is further away from you is going to look smaller even if they are actually the same size!

Things Needed:

  1. Mixed media drawing paper.
  2. Black construction paper
  3. white crayon to draw on black paper
  4. ruler, scissors and gluestick
  5. watercolors

Steps to follow:

  1. On your black construction paper draw 2-3 sailboats. Make the sailboats different sizes. Keep in mind that you are going to stick these on your drawing paper. So don’t make them too large
  2. Next using your scissors cut out these boats and keep them aside.
  3. Now its time to paint the landscape. The first thing to do is to draw a horizon line separating the sky from the sea. I am going to paint a colorful sunset with my watercolors.
  4. Wait for the painting to dry. Next we are going to stick the sailboat cutouts on our paper.
  5. When sticking, the smallest boat is nearest to the horizon and as we go further from the horizon line and come closer to the bottom of the paper, the boats will look bigger, showing that they are closer to the viewer!
  6. Using a n oil pastel or crayon add some water lines under the sailboats. Your artwork is ready to be displayed!

If you would like to watch this lesson as a video please follow the link below:

The Overlap Project: Lesson 1 about Space Element of Art

Overlap is an important way to create an understanding of how space is created on a 2-dimensional art surface. Overlapping helps create an illusion of depth on a 2-dimensional surface. Overlap is the concept where you have an understanding that the object in the front will disrupt the view of an object that’s at the back or in other words the object at the back can hide behind the object at the front so that a part of the object is not visible.

In this project, we will create some fishes in the overlap. We will create 3-5 fishes on our art paper, making sure that at least one pair is in the overlap. We do this by making sure that 1 of the fish is hiding partly behind another fish. We will create a fish stencil using an index card or a 3×5 inch size card stock paper. Then we will use this stencil to create 3-5 fishes on drawing paper. We will create Line designs on these fishes using colorful oil pastels. Then we will paint the background or the negative space using watercolors.

Follow along step-by-step to make this Art Project.

Things Required:

  1. Drawing paper ( at least 8×10 inches Size)
  2. Card stock or index card 3×5 inches
  3. Scissors
  4. Black permanent marker
  5. Oil Pastels
  6. Watercolors

Steps to follow:

  • On the Index card draw the contour( Outline ) of a fish in such a way that it covers most of the paper. Check out the picture below to see how the drawing should look.
  • The next step is to carefully cut out the fish using your scissors. You have created your fish Stencil.
  • Use your Fish stencil and trace around on the drawing paper. You can place your fish anywhere you like. After drawing your first fish, draw the next fish in a way that part of it is hiding behind the first fish. This is called an overlap. Keep in mind that you do not need the trace the parts that will be hidden behind the first fish.
  • Keep adding more fish; make your composition interesting by making the fish going in different directions! You could also add a fish in a way that half of it is going out of your drawing paper!
  • Use a Black Permanent markerto outline your drawing. Then using Oil Pastels or crayons make some Colorful Patterns on your fishes. You can color the rest of the area using Watercolors

If you would like to watch this lesson as a video follow the link below: