Raised Salt Artwork

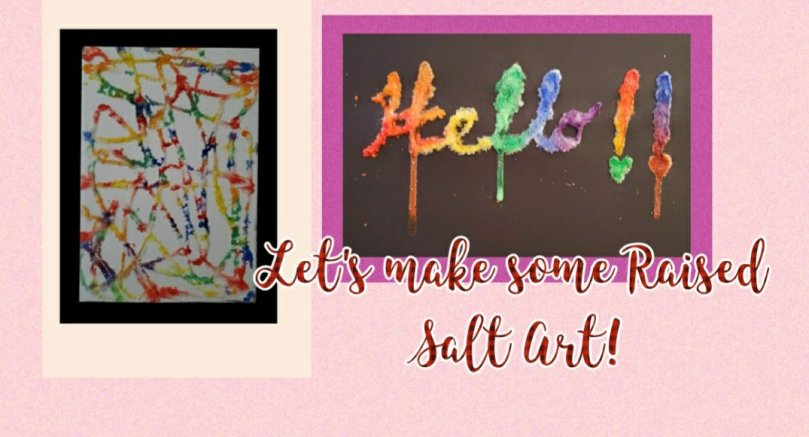
Raised Salt art is one of our Favorite art activities to do when we are stuck at home. Kids and adults can both enjoy the experience of the colors getting absorbed by the salt.

We also spent some time exploring the reason behind it. We learnt about how Absorption works and how some substances can absorb the water whereas others can’t.

WHAT IS ABSORPTION?

Absorption is the phenomenon where one object takes in or soaks up another object. For example, when you spill some water or milk and you use a paper towel to clean it up, the paper towels soaks up the liquid or in other words it Absorbs the liquid.

Since Salt absorbs water, when colorful watercolors touch the salt surface, it absorbs the water leaving colorful pigments on the Salt.

We also colored a paper with crayons and Oil Pastels and Saw that when we put watercolors on that, the oil on the crayons repelled the water away. You can also try it with a rubbing alcohol and see how water is not absorbed by it.

Getting Back to out project, things that we need are:

  1. Mixed-media Paper or Canvas
  2. School Glue
  3. Watercolors
  4. Brush or a Color dropper

How to Make the Art Project:

Step 1: Make any design you would like with your liquid glue.

Step 2: Sprinkle salt over the glue design so that glue would start sticking to your design

Step 3: Create some colorful watercolor puddles in a paint palette or plate.

Step 4: Pick up some color using the paintbrush or a dropper and drop on salt, watch how the salt absorbs the water. Repeat with as many colors as you want to create a colorful design.

Watch this video on YouTube to learn how!

Summer Doodles!

Summer is finally here and the kids are so excited with all the things they get to do! School is out and we have all these free time to spend! But this year, with all the things going on we have not been so outdoorsy. We did go for a walk on the beach last weekend but it was not the same somehow! We miss the summertime barbeques and going to the pool with friends and the outdoor summer get-togethers!

One of the favorite things that my daughter likes to do is capturing photos and then painting them! So this time we decided to spend some time doodling some of the summer activities and stuff that we love about summer!

Sharing some step-by-step drawings of some of our favorite things and Activities that we like to do! Check it out and share what you love about summer!

All about the Space

This week we are exploring all about the space and the Solar System! Space is one of the incredible wonders with the vastness and the amazing objects. It might not be easy to learn all about it, but we did learn a lot of cool things about Space. We also drew our own Solar System with the planets and the Sun. We also learnt to draw some Space Doodles! Though it might not be possible for us to share everything, we are trying to share some of the cool stuff we learnt about the Space and our own Solar system.

SOME FACTS ABOUT SPACE

  1. Space is absolutely Dark and Silent. The Sky just appears to be blue because of the Scattering of light from the Sun. But the objects in the space might appear to be different ColorsSpace has no Atmosphere which makes it impossible for sound to travel.
  2. Galaxy is a group of stars, planets and gas particles in the space. There are innumerable galaxies in the universe. The Sun and Earth with the other planets of the Solar System is a part of the Milky Way Galaxy.
  3. Even though the Universe is constantly expanding, Gravity is what hold the galaxies together.
  4. The Milky Way is a Spiral Galaxy, all the stars that we see in the night sky are from our own galaxy. It is called the Milky way because it looks like a milky colored light when we look at it in the dark night sky. But galaxies could be other shapes like Spiral or irregular too.
  5. There are a lot of Satellites Orbiting the Earth, but Moon is its only Natural Satellite!The other one’s are artificial satellites sent to the space by us Humans!

We read a lot more about it in NASA’s website for kids https://spaceplace.nasa.gov/galaxy/en/

We drew a few fun things that could be in space, real and Fiction! Well, space is so vast…who knows if there is life somewhere…who knows if there is Alien life trying to reach us!!

Check out the Slideshow below to learn how to draw these Cute doodles that we learnt to draw!

We also Spent Some time Learning about Each of the Planets of our Solar System and we also Drew a modal Solar System of our own!

Some Fun FACTS about the Planets in our Solar System

  1. Our Solar System Consisting of 8 Planets orbiting around the Sun.
  2. MERCURY- Mercury is the smallest planet, its closest to the Sun and it has an Oval shaped Orbit, which means at different times it’s distance from the Sun is Different. It takes 88 Days to completely revolve around the Sun 1 time. It also rotates very slowly, so a day on Mercury is 59 Earth Days long
  3. VENUS- Venus is the next planet orbiting around the Sun, though it is not the closest planet, it is the Hottest Planet of our solar system. It rotates in opposite direction to Earth and most other planets and very slowly too. So a Day on the Venus is 243 Earth Days where as one Year is 225 Earth days. Which means a DAY on the Venus longer than an YEAR on Venus!!
  4. EARTH- Earth is the Planet we live on. It’s the only planet in our Solar System that is known to have life. Did you Know that about three-fourth of our Earth is Water? Earth has just one moon… What else can you think about our planet Moon?
  5. MARS- Mars is a Small and Rocky Planet with a very thin Layer of atmosphere. It appears Red because of the rusted iron on its Surface. Its the only other planet in the Solar System where there could be a remote possibility of Life!
  6. JUPITER- Jupiter is the biggest planet in our solar system. Jupiter is a gas giant. It is mostly made by hydrogen and helium. Jupiter also has rings, but they’re very hard to see.
  7. SATURN- Saturn is a gas giant like Jupiter and it is made mostly of hydrogen and helium. Saturn has a set of seven main rings with spaces between them. Saturn has a thick atmosphere and has 53 moons!
  8. URUNUS- Uranus is made of water, methane, and ammonia fluids above a small rocky center and is the only planet that spins on its side. This planet spins the opposite direction as Earth and most other planets. Uranus is also an ice giant.
  9. NEPTUNE- Neptune is dark, cold, and very windy. It is the coldest planet in our solar system. It’s made of a thick fog of water, ammonia, and methane over an Earth-sized solid center. Neptune is an ice giant like Uranus.

We Used the following Site from NASA to get a lot of Information, check out the link. https://spaceplace.nasa.gov/menu/solar-system/

Next we drew our Solar System, we tried our best to make it look as accurate as possible…

Check out How we drew our solar system by following the link below

Make a Mighty Lion!

This week we did a fun mixed-media art Project, where we learnt to draw a cute Lion and created its mane using colorful Construction Paper.

We also explored and learnt some fun-facts about the lions!

Here are some facts about lions that the kids found interesting:

  1. Did you know that lions are classified as Asiatic Lions and African lions?Asian Lions are smaller in size compared to the African lions.

2. Lions belong to the cat family but they are the only cats who live in a group called PRIDE.

3. The life-span of a lion is between 10-14 years. We also learnt that the lifespan of animals might be longer in captivity than in wild because they are safer from natural calamities, have food and medical care etc.

4. Female lions are the hunters whereas the male lions guard their home and tend to the young.

5. They live on Grasslands where they can hide and find some cover and have plenty of water to drink.

6. Lions hunt every few days and feed on their hunt until its finished and then they go to find more food.

7. The name Simba from the famous LION KING movie comes the African language Swahili (Simba means Lion).

8. Lions are considered an endangered species. Asiatic lions were found from Western Asia to the Middle east in the past. The African lions were found all over Africa, but now wild African lions are mostly only found in Sub-Saharan Western Africa and only one Country in Asia(Gir National Forest in India).

We read about lions in the kids National Geographic Website. Check it out here: https://kids.nationalgeographic.com/animals/mammals/lion/

Coming back to our art Project, Supplies that we need are

  1. Art Paper
  2. Pencils and eraser
  3. Watercolors
  4. Colorful ConstructionPaper at least 2 colors
  5. Scissors
  6. Glue Stick

In a gist, all we are going to do is : Draw a Lion ( leave out the mane for now), color it with water colors, let it dry. Cut small rectangle strips of your construction paper and stick it around the lion’s face to make a cute mane! Follow the video link below to learn it step-by-step!

All about the Farm

This week we have been all about the farm! The kids started as wanting to draw the flower fields, but then we started adding more things to the farm! We ended up with around 15 things to draw on the farm..

Check out all the things we learnt to draw on our On the Farm theme!!

This slideshow requires JavaScript.

Also check out the little video we made on how to draw a flower field on a farm!


Also check out the art by the kids on our last week’s Online art Session! What’s on your Farm??

IMG_20200515_124816_399


Art Inspired by Van Gogh’s starry night

Vincent Van Gogh (Born-1853, death-1890) is one one the very well-known post impressionist Artist. He was the son of a Dutch Pastor who moved to Paris to live with his brother at the age of 33, this is where he came across Impressionist artist…in time he developed his own distinct style. Throughout is life he had travelled to a lot of places and that’s when he taught himself art; even though he was not successful in copying other impressionists style, he developed his own style in the process which was bold and unconventional at the time!

Van Gogh’s starry night is one of those popular Paintings in which you can see his unconventional style of painting and also its one of those artworks that has inspired many! ART inspired by starry night has been popular among all age-group!

Follow the link below to check out his paintings and his Most Famous Painting

https://www.vangoghgallery.com/painting/starry-night.html

The use of distinct lines to capture the image of each object creates an interesting effect on the painting! Check out these creations the kids did while learning about the Artist and his work!

92573475_512077479466974_1552322865787830272_o

Paper-Tear art

20200423_1222475910510248396034625.jpg

Tearing paper is an excellent activity for improving your fine-motor skills and trying to make something meaningful by tearing a piece of paper instead of cutting it using scissors..its fun and its also a great shape lesson ides on how simple shapes can be used to create an object.

You can use all the paper scraps that are available at home, color it in different colors to get some colorful papers! You could also use construction papers or maybe even old newspapers!

Check out this paper-tear  “flowers in a pot” art that we did this week!

  1. Get some colorful Paper. Choose the paper that you would want to use as the base.


2. Start tearing and placing your idea on the paper…do not glue it yet.

3. Once you have your idea laid out and all the pieces teared , you are all ready to glue and that’s about it!!

20200423_1046523119457299742631031.jpg


Pointillism Technique(Dot Painting) Inspired by Georges Seurat -The Eiffel Tower Painting

Let’s start by getting to understand the meaning of Pointillism in Art.

Pointillism is an Art techniques where the image is formed by applying dots in a specific Pattern.Georges Seurat and Paul Signac developed this Technique in 1886.

Georges Seurat was a French Artist born 1851 in Paris. He died in 1891 at the young age of 31. But in this short lifespan he got a lot of critical appreciation for his painting Techniques. In this post we will try to create some artwork inspired by one of Seurat’s popular paintings The Eiffel Tower( 1889). 

Some Fun Facts:

Seurat actually finished his painting 2 months before the actual Eiffel Tower was finished. When the construction of Eiffel tower was finished, the structure was painted a Reddish brown color to prevent rust, over the years it has been painted multiple times with a lot of different colors before it was painted the current Bronze color.

We will first draw a simple drawing Of Eiffel Tower first and then try to color it using the Pointillism technique.

Things Required:

  1. Drawing Paper, pencil and Eraser
  2. Acrylic Paint or Tempera Paint
  3. Some Q-tips

HOW TO DRAW THE EIFFEL TOWER step-by-step


20200406_140457


Once you have your outline of Eiffel Tower, you plan to paint it using Pointillism Technique.

Get your colors organized..I used Red and Yellow and a little brown for the Eiffel Tower and some Green, Yellow and Blue for the Background.

You can practice  applying the paint inside a drawing on a practice paper using a Q-tip first and then when you get an idea of how it might work, you can apply the paint on the Actual Drawing.

You can practice making a ball and a flower on your practice paper, before working on our Eiffel Tower Drawing.


Started with the lighter shade(yellow) and then added red on top.

After practicing working with the Q-tips, we are finally ready to apply it on our Eiffel tower drawing!

20200405_123234


You can try some other simple ideas like a sailboat, a fall tree or a balloon with the same technique too!!

20200405_160355


Picasso’s Cubism Inspired Abstract Art Project

This week we tried a fun art project inspired by Picasso’s Cubism Technique. It is a great technique to explore with kids of all ages.  Since it is an abstract art project you don’t need the drawing to be perfect and so it works great if you have a 4 year old or a 12 year old!

20200331_172119

Let’s start by getting to know a little bit about CUBISM.

What is Cubism?

Cubism is an abstract Art form where objects are broken into pieces and then rearranged to create an abstract art form.

Cubism was co-created by Pablo Picasso and Georges Braque in 1907.

The first step in this project is deciding on something to draw. We decided to choose a still-life object for the project but it would work with any object that you choose.

Step1:

Decide on an object to draw. I decided on a water-jug. Now on a White drawing paper or printer paper draw your object. Make it big, so that it covers at least 3/4th of your paper.

20200331_160213

Step2:

Now fold your paper multiple times in random folds.

20200331_160311

Step3:

Now unfold your paper. You will see that there are lines on the folds you made. Outline the lines with a pencil.

Step4:

Now the drawing is ready to be colored. I decided to use colored pencils, but you may pick any medium you like.You can color each of the boxes you made with different colors. Have some fun, add patterns to the when you color! You can also outline the lines with a marker to add some value.

20200331_161816
20200331_164852

The kids made a Pizza slice and Starbucks Drink and I also had some fun with a Guitar!! So draw anything you like, make it colorful and have fun with it!!

THE PUZZLE PROJECT

There is another way to do the Cubism Project too..After you made the patterns on your object, cut out the drawing along the lines and put it back together! You don’t have to put it back together as a puzzle, you can connect it in a different way and make an interesting drawing instead.

Ask your friend to guess what was the initial drawing!!

Kandinsky’s Concentric circles Inspired Abstract art

Abstract art is a great way to introduce kids to art and nothing better than Kandinsky’s Concentric Circles to explain and explore the Color theory. Kids can explore how different colors placed next to each other can create different moods and effects.

I would greatly suggest to create a Simple Color wheel with the kids for reference so that they can easily refer to it and see what happens and how it looks when complementary or analogous Colors are painted next to each other in the concentric circle.

This is a simple Color Wheel that I made with my 5 year old and we used it and experimented by making some circles having analogous Colors next to each other and others with Complementary Colors next to each other.

20200401_113240123706198734888753.jpg

Explain About Primary and Secondary Colors, Tertiary colors can be introduced too for the older kids. 

Primary Colors The colors RED,BLUE and YELLOW are called Primary colors because they cannot be achieved by mixing any other colors.

Secondary Colors The colors VIOLET(PURPLE), ORANGE and GREEN are secondary colors and they are achieved by mixing equal parts of two primary colors.

Tertiary colors The colors which are achieved by mixing a primary color with a secondary color.

Talk about Analogous And Complementary colors.Ask them to look at the Color wheel and make a list of Analogous colors and Complementary Colors.

Analogous-Colors next to each other on the color wheel for example: Red and Orange, Blue and Green

Complementary-Colors opposite to each other on the color wheel For Example: Yellow and Purple, Blue and Orange

Next Introduce them To the Famous Artist and his art on the Concentric circles inside individual Squares. 

 Wassily Kandinsky (1866-1944)

Kandinsky was a Painter and art theorist born in 1933 in Moscow, Russia. He was credited for his abstract works.His Squares with Concentric Circles, 1913 is a very famous artwork and is used a lot to learn about color theory.

 Then we tried to create our own version of his artwork  using our colored pencils. As you see we did 12 concentric circles, which is also a great way to try out what we learnt in our color theory lesson.

20200401_165032

Next we created a few more artwork inspired by the above artwork. We made a butterfly, a flower and butterfly and also a bird on a branch. You can also try out many other things like a tree with branches with the circles as leaves!!

Think about some more different ideas where you can apply this technique, try out all the different combination of colors you could use!!
Here’s an idea that you may use for inspiration!


20200428_2016503868329089833716429.jpg


Also you may follow the Link below to see an easy Abstract we did based on what we learnt:


How to draw Minnie Mouse-step-by-step

Minnie Mouse has always been one of my favorite characters to draw.  I love to draw her in her Original created look with her Red Polka Dot Dress, red Bow and her patched Knicker. I have tried to take pictures at each step of my drawing, to explain how to create a Minnie Mouse!  Also check out the step-by-step Mickey Mouse in the previous Post. (https://nishasartforkids.com/2020/03/20/creating-classic-characters-mickey-mouse/)

  1. Start with the outline.

20200324_114556

2. Start adding the details, the shoes and features on the face.20200324_114621

3. Finish off by Adding the Polka Dots on the dress, darkening the hands, feet, nose and ear. Have Fun Coloring!!

20200324_114632


Please keep following as we come up with some Spring/Easter Doodles for the next post!


Creating Classic Characters- Mickey Mouse

Mickey and Minnie are two of the classic Disney Characters that has been equally popular with kids and adults! Our kids, our parents and our grandparents have grown up watching them! From Black-and-white to Color, from the classic Steamboat Willie’s to the Mickey Mouse Clubhouse; we have enjoyed them all!So lets have some fun reliving our childhood as I am going to show you how to make our all-time favorite Mickey Mouse!!

20200320_14242020200320_14242820200320_142445

Hope you have fun learning to draw Mickey because I am going to be back in my next post with our next favorite Minnie!!