

Colored pencils are a great medium for any beginner artist and they can create phenomenal results when used properly.
I have had a lot of parents showing frustration that when their kids use them, the colors do not seem to be bright and it is not easy for them to blend it together or even just color it smoothly without avoiding all the white spaces. The pigments in the colored pencils are generally held together using wax or oil. But usually, the colored pencils that are made for kids are made with hard wax, and hence it’s not so easy to lay down colors so easily. But at the same time, it is much easier to maintain compared to the Softcore wax-based more expensive oil pastels. The soft-core colored pencils do have the ability to blend better and it is easier to lay down the colors. But if not handled properly, it is much more brittle.
For blending and applying different techniques, the type of paper you use is also important. We do want the paper to have some tooth so that it can hold multiple layers of colors when blending but at the same time a paper that’s too rough is also not so good because that may leave a lot of gaps when you color and add details.
You can also use a colorless blending pencil to get a smooth blended effect on colored pencils. Wax or oil-based colored pencils could also be blended with baby oil while watercolor pencils can be blended using water( Read about watercolor pencils hereWatercolor Pencils for Little artists! ) But in this post, we will be discussing some basic beginner wax-based colored pencils. The color pencil I used here are Prismacolor Premier Soft Corepencilshttps://www.amazon.com/dp/B000C6RCD0/ref=cm_sw_em_r_mt_dp_EsnEFbC3472KH
Colored Pencil Techniques
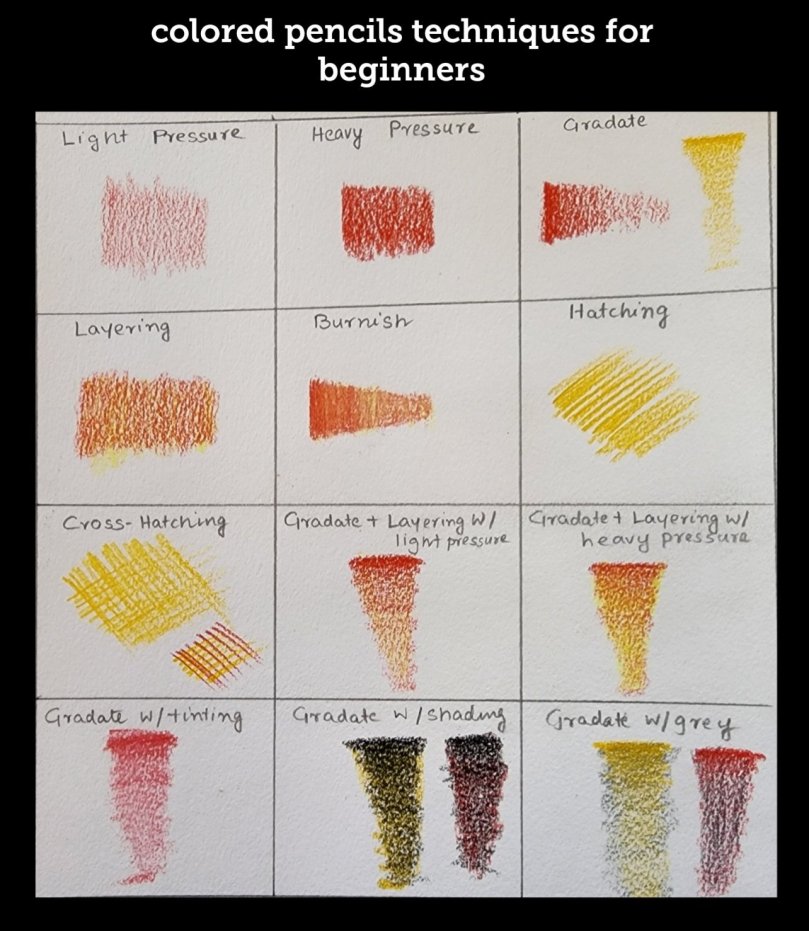
Colored pencils can give very different results based on the amount of pressure you apply. Coloring with light pressure will give a different effect compared to coloring with heavy pressure. So that’s what the first 3 techniques are:
- Light pressure- coloring with light pressure
2. Heavy Pressure- Coloring with heavy pressure
3. Gradate- Start with heavy pressure and lighten the pressure as you go forward
The next couple of techniques are when we layer or blend multiple colors to create different effects
4. Layering- Start with a dark color and layer on top with a lighter color
5. Burnish -Gradate+ Layering +blending with eraser. Use gradate technique, layer with colors, and blend it with an eraser or a colorless blender
6. Hatching
Colored with straight line strokes
7. Cross Hatching
Hatching in vertical and horizontal lines
8. Gradate+ Layering with Light Pressure
Use gradate technique and then blend in a lighter color with light pressure
9. Gradate+ Layering with Heavy Pressure
Use gradate technique and then blend in a lighter color with heavy pressure
10. Gradate with Tinting
Gradate and then layer with white
11. Gradate with Shading
Gradate with black and layer with another color
12. Gradate with Grey
Gradate and then layer with gray
To practice, and learn each of these techniques follow the link to my YouTube Video and color with me step-by-step:

[…] We will use the techniques we learned in our previous lesson( https://nishasartforkids.com/2022/11/10/colored-pencils-techniques-for-beginners-lesson-1/) […]
LikeLike