Vincent Van Gogh (Born-1853, death-1890) is one one the very well-known post impressionist Artist. He was the son of a Dutch Pastor who moved to Paris to live with his brother at the age of 33, this is where he came across Impressionist artist…in time he developed his own distinct style. Throughout is life he had travelled to a lot of places and that’s when he taught himself art; even though he was not successful in copying other impressionists style, he developed his own style in the process which was bold and unconventional at the time!
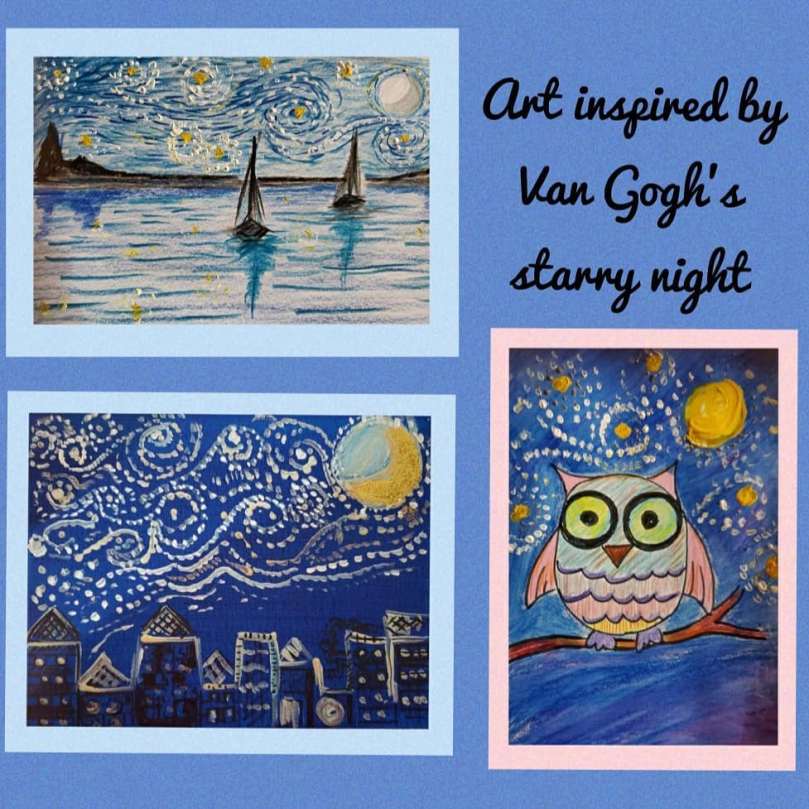
Van Gogh’s starry night is one of those popular Paintings in which you can see his unconventional style of painting and also its one of those artworks that has inspired many! ART inspired by starry night has been popular among all age-group!
Follow the link below to check out his paintings and his Most Famous Painting
The use of distinct lines to capture the image of each object creates an interesting effect on the painting! Check out these creations the kids did while learning about the Artist and his work!
Tearing paper is an excellent activity for improving your fine-motor skills and trying to make something meaningful by tearing a piece of paper instead of cutting it using scissors..its fun and its also a great shape lesson ides on how simple shapes can be used to create an object.
You can use all the paper scraps that are available at home, color it in different colors to get some colorful papers! You could also use construction papers or maybe even old newspapers!
Check out this paper-tear “flowers in a pot” art that we did this week!
Get some colorful Paper. Choose the paper that you would want to use as the base.
2. Start tearing and placing your idea on the paper…do not glue it yet.
3. Once you have your idea laid out and all the pieces teared , you are all ready to glue and that’s about it!!
Let’s start by getting to understand the meaning of Pointillism in Art.
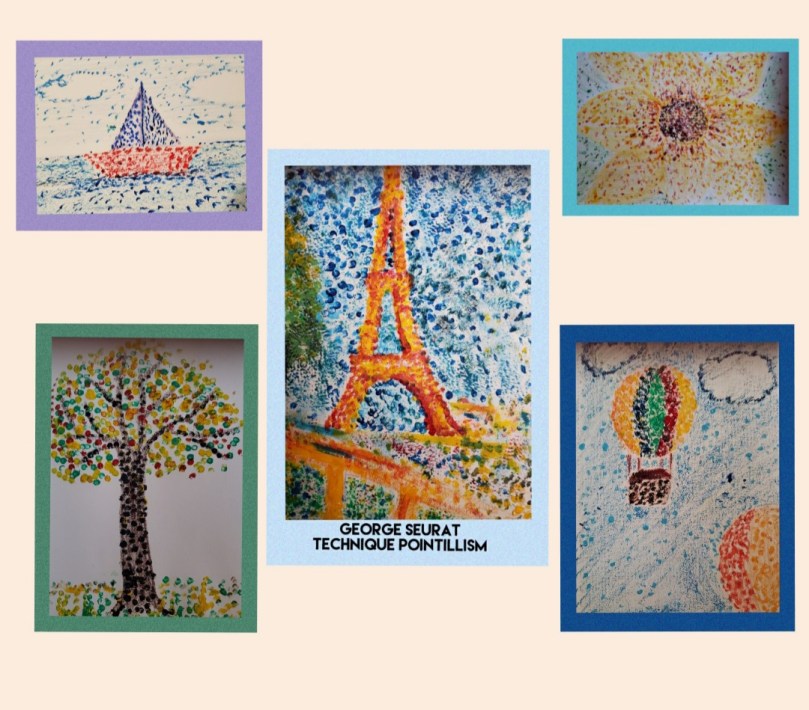
Pointillism is an Art techniques where the image is formed by applying dots in a specific Pattern.Georges Seurat and Paul Signac developed this Technique in 1886.
Georges Seurat was a French Artist born 1851 in Paris. He died in 1891 at the young age of 31. But in this short lifespan he got a lot of critical appreciation for his painting Techniques. In this post we will try to create some artwork inspired by one of Seurat’s popular paintings The Eiffel Tower( 1889).
Some Fun Facts:
Seurat actually finished his painting 2 months before the actual Eiffel Tower was finished. When the construction of Eiffel tower was finished, the structure was painted a Reddish brown color to prevent rust, over the years it has been painted multiple times with a lot of different colors before it was painted the current Bronze color.
We will first draw a simple drawing Of Eiffel Tower first and then try to color it using the Pointillism technique.
Things Required:
Drawing Paper, pencil and Eraser
Acrylic Paint or Tempera Paint
Some Q-tips
HOW TO DRAW THE EIFFEL TOWER step-by-step
Once you have your outline of Eiffel Tower, you plan to paint it using Pointillism Technique.
Get your colors organized..I used Red and Yellow and a little brown for the Eiffel Tower and some Green, Yellow and Blue for the Background.
You can practice applying the paint inside a drawing on a practice paper using a Q-tip first and then when you get an idea of how it might work, you can apply the paint on the Actual Drawing.
You can practice making a ball and a flower on your practice paper, before working on our Eiffel Tower Drawing.
Started with the lighter shade(yellow) and then added red on top.
After practicing working with the Q-tips, we are finally ready to apply it on our Eiffel tower drawing!
You can try some other simple ideas like a sailboat, a fall tree or a balloon with the same technique too!!
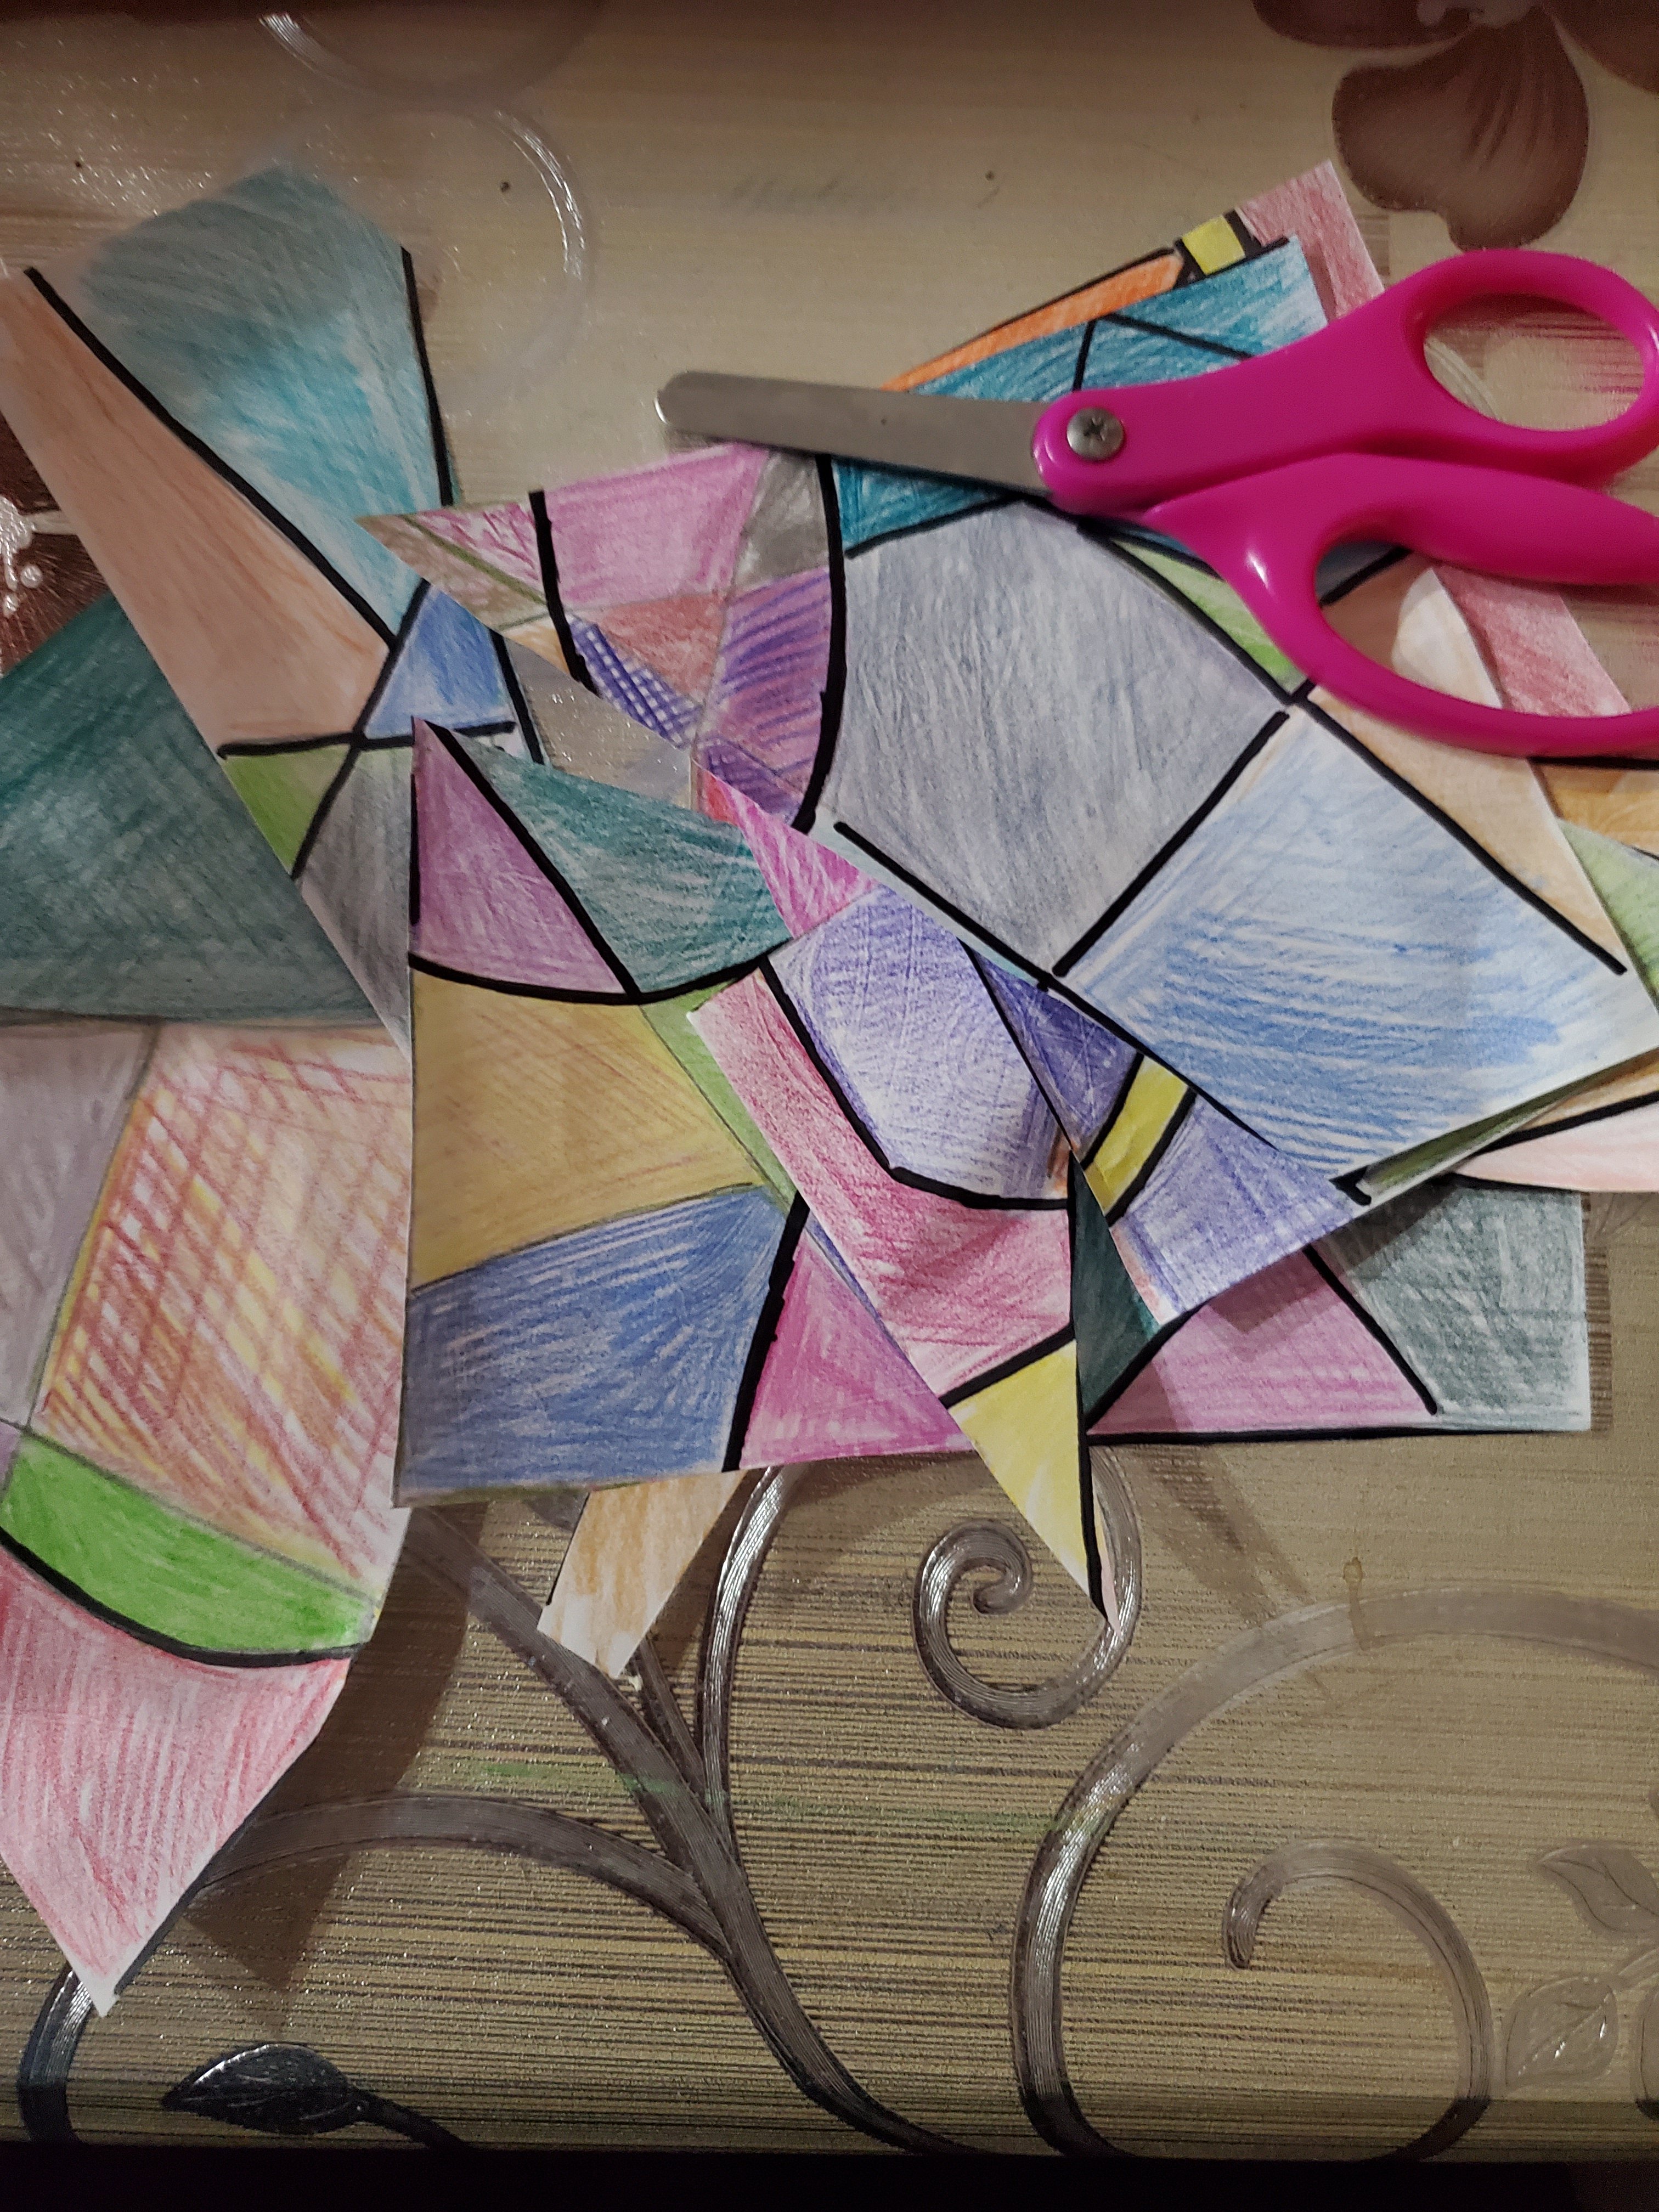
This week we tried a fun art project inspired by Picasso’s Cubism Technique. It is a great technique to explore with kids of all ages. Since it is an abstract art project you don’t need the drawing to be perfect and so it works great if you have a 4 year old or a 12 year old!
Let’s start by getting to know a little bit about CUBISM.
What is Cubism?
Cubism is an abstract Art form where objects are broken into pieces and then rearranged to create an abstract art form.
Cubism was co-created by Pablo Picasso and Georges Braque in 1907.
The first step in this project is deciding on something to draw. We decided to choose a still-life object for the project but it would work with any object that you choose.
Step1:
Decide on an object to draw. I decided on a water-jug. Now on a White drawing paper or printer paper draw your object. Make it big, so that it covers at least 3/4th of your paper.
Step2:
Now fold your paper multiple times in random folds.
Step3:
Now unfold your paper. You will see that there are lines on the folds you made. Outline the lines with a pencil.
Step4:
Now the drawing is ready to be colored. I decided to use colored pencils, but you may pick any medium you like.You can color each of the boxes you made with different colors. Have some fun, add patterns to the when you color! You can also outline the lines with a marker to add some value.
The kids made a Pizza slice and Starbucks Drink and I also had some fun with a Guitar!! So draw anything you like, make it colorful and have fun with it!!
THE PUZZLE PROJECT
There is another way to do the Cubism Project too..After you made the patterns on your object, cut out the drawing along the lines and put it back together! You don’t have to put it back together as a puzzle, you can connect it in a different way and make an interesting drawing instead.
Ask your friend to guess what was the initial drawing!!
Abstract art is a great way to introduce kids to art and nothing better than Kandinsky’s Concentric Circles to explain and explore the Color theory. Kids can explore how different colors placed next to each other can create different moods and effects.
I would greatly suggest to create a Simple Color wheel with the kids for reference so that they can easily refer to it and see what happens and how it looks when complementary or analogous Colors are painted next to each other in the concentric circle.
This is a simple Color Wheel that I made with my 5 year old and we used it and experimented by making some circles having analogous Colors next to each other and others with Complementary Colors next to each other.
–
Explain About Primary and Secondary Colors, Tertiary colors can be introduced too for the older kids.
Primary Colors The colors RED,BLUE and YELLOW are called Primary colors because they cannot be achieved by mixing any other colors.
Secondary Colors The colors VIOLET(PURPLE), ORANGE and GREEN are secondary colors and they are achieved by mixing equal parts of two primary colors.
Tertiary colors The colors which are achieved by mixing a primary color with a secondary color.
Talk about Analogous And Complementary colors.Ask them to look at the Color wheel and make a list of Analogous colors and Complementary Colors.
Analogous-Colors next to each other on the color wheel for example: Red and Orange, Blue and Green
Complementary-Colors opposite to each other on the color wheel For Example: Yellow and Purple, Blue and Orange
Next Introduce them To the Famous Artist and his art on the Concentric circles inside individual Squares.
Wassily Kandinsky (1866-1944)
Kandinsky was a Painter and art theorist born in 1933 in Moscow, Russia. He was credited for his abstract works.His Squares with Concentric Circles, 1913 is a very famous artwork and is used a lot to learn about color theory.
Then we tried to create our own version of his artwork using our colored pencils. As you see we did 12 concentric circles, which is also a great way to try out what we learnt in our color theory lesson.
Next we created a few more artwork inspired by the above artwork. We made a butterfly, a flower and butterfly and also a bird on a branch. You can also try out many other things like a tree with branches with the circles as leaves!!
Think about some more different ideas where you can apply this technique, try out all the different combination of colors you could use!! Here’s an idea that you may use for inspiration!
Also you may follow the Link below to see an easy Abstract we did based on what we learnt:


 –
–


